Image Tab


The image tab lets you set many attributes about each image. While you can skip this altogether, for the most part, many options in this tab will improve your webpages.


Basic

You can set the image's title, caption, photographer and date using this tab. These fields can be displayed in either or both the index or seperate image pages of your final webpage.

Title/caption - The title/caption is the main object to add for your images. If selected in the preference, "Convert Filename to Caption," Image2Web will autoload the title/caption block with the image's filename. While that is not very helpful for digital cameras, it is helpful if you have scanned in your pictures, or chipped them from iMovie and given them a useful filename already.

Plus Button - The same on the tool panel is limited. Thus, if you want more text, click the plus button. It will bring up a textbox where you can add as many lines as you want. While you can only see a few lines here, they can be previewed on the index and page tabs.

Important Note - Avoid the use of returns or new lines in the text blocks. If you try to make your text pretty, it won't work. HTML doesn't support returns without doing some weird stuff so Image2Web will not display the text correctly. You can try it and see if you like the result, but you have been warned.
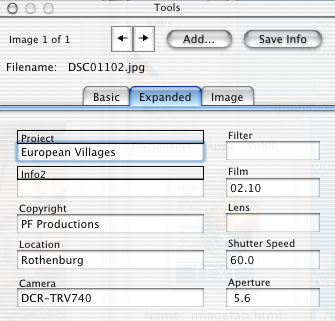
Reference Number

- The number will increase with every image you add to the program. It allows people to reference a specific image without needing to worry about common filenames or which webpage they are looking at. If you save the metadata, it will be stored in the image. Anytime that image is used, the same number will be there. The number will not repeat (as long as you don't use a different computer)

What happens if I do need a different computer? No problem. In preferences there is the option to set the starting value for the reference number. Just enter in the next number that you left off with and continue.

What if I regularly use two computers? Then let one computer start at 1 and have the other computer start at 10,000 or another really big value. Thus, they both can increment without running into each other (at least for 9,999 images)

What if I don't save the metadata? If you don't save the metadata, then everytime you add an image (regardless as to how many times it has been used), it will have a new and unique number. I suggest going into the preferences and turning the "Update Image Info" to "Auto After Change."


Expanded

The expanded tab gives you many more metadata fields for you to use. It is designed to help the professional photographer, the serious amateur, or the hobbiest that wants to save a bit more info about their pictures. Yes, you can leave all of these blank! Also, you can use the preferences to set Autoload for: Camera, Copyright and Film. Set these to your typical values and every image that is loaded will have that value already set. If you need to adjust the info, just correct it (here or using menu Webpage-Propagate) and update the image info.

If you are using a digital camera, many of these fields will be already filled in with the EXIF metadata that the camera stores.

Info1 & Info2 - I have left two generic fields to be used by you. By clicking on the label above the field (where the word 'info1' or 'info2" are) you can change the label. These label changes will be saved in the webpage definition and displayed in both the preview and final generated webpage.


Image

This provides you some basic info about your image. You can see the image resolution and file size. This is useful for generating a webpage since some files need to be made smaller (both pixels and/or file size) which Image2Web does very easily.


Lock - When you select lock, it keeps you from accidently deleting an image. Just select lock and the menu command, "Delete", will not work. Turn off lock and it is back to normal.

Star - Star is the image which showes up in the digital workspace window. Only one image can be the star of the webpage. It is this image which is shown in the digital workspace window and used as the thumbnail in the Master Index. By default, the first image is the star. Select a different image, and the old is reset. This is useful for story webpages where the first image may not represent the entire webpage (e.g. a vacation to Hawaii with the first picture being an airplane - it makes sense as the 1st of a story, but not to remind you of the trip).

Rotate - Rotate turns the image 90 degrees in one direction for each click.

Mirror - This button flips the image over the horizontal or vertical axis (as the icon shows).


Saving metadata

Once you get done typing in all that information about the image...who took it, where, when and why, save it using the "Update Info" button. This will embed all the information you have loaded about the image into the comments field of the image. This doesn't not hurt the image or decrease the quality.

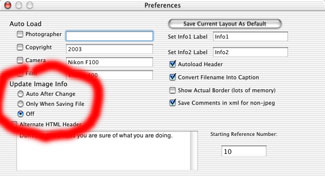
Updating Options - In the perferences panel, you can set one of three options for when to update the metadata.
  1. Auto After Change - Every time you type something, it will automatically save the data. This ensures there is no loss of data and is the one I usually use. Note - if you are using the "Auto Load" option (such as photographer), the default values will be stored. So remember, if you wife took some of the pictures, go back and give her the credit because your name will already be there.
  2. Only When Saving File - As the name says, when you save the file (or do Generate/Save) it will also update all the image's metadata. The is a conservative option.
  3. Off - The metadata will not be saved (updated) without your directly telling it. You can click the "Update Info" button. Or when you save the file, it will let you click, Yes, No, Yes to all, No to all. This will keep the images from being altered without you directly telling the computer to do so

Non-jpeg - If your image in a non-jepg (pict, gif, tiff), you can have all the metadata saved in a seperate file (since they don't have the same comment data structure). Go into preferences and turn on "Save Comments in xml for non-jpeg." Then when you update the image info, a file with the same name, but with .xml extension will be created which keeps the metadata.

Why do this? If you save this information, then when you reuse the images, they will have all that data available. Let's say you go to the Grand Canyon and take a lot of pictures. You load them up for a webpage. You decided not to have the location displayed in the final product since they will all be "Grand Canyon." However, by adding it now, then when you go back and take the best pictures for a "highlights of 2004" webpage, the location field is loaded.

Won't this take a lot of time? Not really. Check out the "Webpage->Propegate Menu." This is a tool to let you bulk load any metadata entry you want (see Menus help page). This is a very useful tool since you can have it overwrite a field for all images, or only images with no value currently there. Check out the organize tab for how to only load the field for a a selected group of images.


EXIF

Digital cameras embed some information into the image when you take the picture. Image2Web will read this metadata and make the most relevent pieces available to you. Note, many datafields are not normally useful for a webpage, however, I had those datafields loaded into the "comments" section so you could see them and keep anything you wanted - such as flash, focal length, etc. While not usually very useful, I leave it for you to decide.


Tool Panel Transparency

You can set the tool panel to mostly transparent (between 100 and 20% - don't you just love OpenGL?) What this lets you do is to resize the window very big. Then make the tool panel have a transparency of about 40% and move it into the middle of things. You will be able to see both the controls and the stuff behind it.